
2.1.1 First we must install Python, then we will install the Jupyter programming interface using a virtual environment. System requirements are 8GB RAM.
2.1.2 Search Google or Bing for python.org. Click on Downloads. (OR Navigate to Python Releases for Windows. Select Windows Installer(64-bit) to start download.) Click Open file in the download box on your computer. The application file will open.
2.1.3 Check the box Add Python to PATH. Click on Install Now. Follow the prompts. Click on Disable path length limit. Select Close.
2.1.4 Next open the Start menu on your computer. Look for the Python icon. Click on the IDLE tab. Type print("Hello World") at the command line. Press Enter and Hello World will appear. Python is working.
2.1.5 Open the Windows command prompt by typing cmd in the Search bar. Type python --version and press Enter. The python version will appear. Python from the cmd prompt is working.
>2.2.1 Next we will install the Jupyter programming interface with a virtual environment. This is where we will write and run the Python code. Open a command prompt with cmd in the search bar.
Create a virtual environment using the venv module built into Python. This creates a directory my_env containing the isolated environment. Use any name you wish for my_env.
python -m venv my_env
2.2.2 Activate the environment my_env. Once activated, the environment's name will appear in the command prompt. This indicates it is active.
my_env\Scripts\activate
2.2.3 While in your virtual environment check the pip version. If present continue to 2.2.4.
pip --version
While in your virtual environment update pip with the following (if necessary):
python.exe -m pip install –-upgrade pip
pip install jupyterlab
2.2.5 While in your virtual environment you can install project specific dependencies (packages) using pip. Commonly used packages for data science are listed.
pip install numpy pandas matplotlib seaborn scikit-learn scipy
2.2.6 While in your virtual environment launch Jupyter Lab by typing:
jupyter lab
2.2.7 The Jupyter Lab interface will be displayed in your web browser.
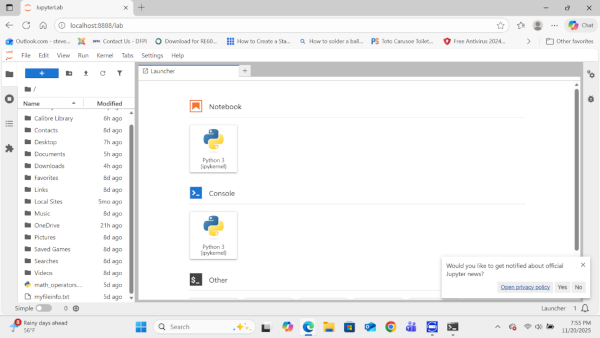
2.2.8 Navigate to File->New->Notebook. The Jupyter notebook programming interface page will open. Click on an open cell and type:
print("Hello World")
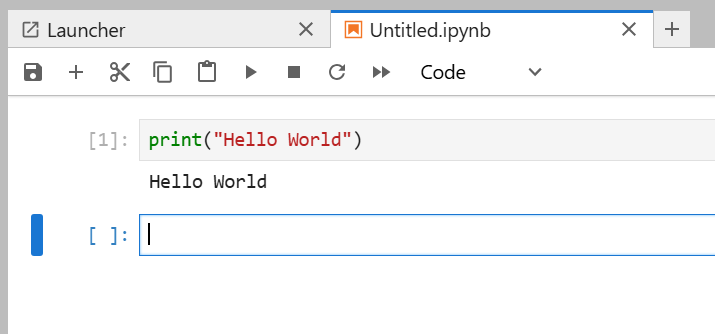
2.2.9 Activate the cell and press Run. (Run is the small triangle.) This completes your first test program.
Hello World
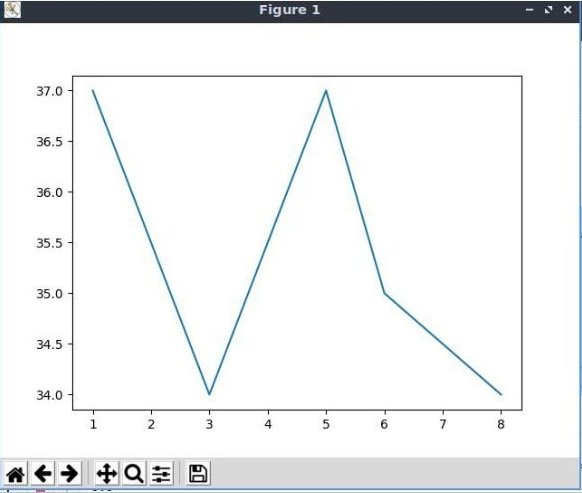
2.2.10 Enter the following plotting program. Run it.
# A simple plotting program

      # import matplotlib to plot graphs, and numpy for arrays

      import matplotlib.pyplot as plt

      import numpy as np

      days = [1,3,5,6,8,]

      temp = [37,34,37,35,34]

      plt.plot(days, temp)

      plt.show()
2.2.11 If you make a mistake entering the program, there could be an error message in the cell below the program code. Simply right click on the error message cell, and select Clear Cell Output from the drop-down menu. Make corrections to your code and run it again.
2.2.12 To deactivate the virtual environment at your command line, simply enter:
deactivate
2.3.1 Finding virtual environments. The following command will help you find where virtual environment files are stored on your computer. (Deactivate your virtual environment before using this command.)
where /R %HOMEPATH% python.exe
Sort through the results to find your virtual environment files.
2.3.2 Deleting virtual environments. Use file explorer to follow the path to virtual environment folders and delete.
SALARSEN.COM
Windows11 Simple Install
Windows11 Virtual Install
Ubuntu Virtual Install
Using Jupyter
