4.1.1 For a Chapter 1 installation. Type cmd in the search box in Windows 11. Open the command line. Type the following and press enter. The Jupyter Lab interface will open in your web browser.
jupyter lab
4.1.2 If a virtual environment was created (as in Chapter 2), first type:
my_env\Scripts\activate
The prompt will change to show you are in a vitual environment called my_env. Next, at the my_env command prompt type:
jupyter lab
The Jupyter Lab interface will open in your web browser.
4.2.1 Open the command line terminal in Ubuntu. First we need to activate the virtual environment. Type the following. (myenv is the name of the virtual environment we created when installing Jupyter.)
source myenv/bin/activate
4.2.2 Your prompt will change to show that you are in the virtual environment called myenv.
(myenv) steve@ubuntu-linux:~$
4.2.3 Stay in the virtual environment. Type the following after the prompt.
jupyter lab
The Jupyter Lab interface will open in your web browser.
4.3.1 Once in the Jupyter interface, Windows 11 and Ubuntu act the same.
4.3.2 Navigate to File->New->Notebook. The Jupyter notebook programming interface page will open. Click on an open cell and type:
print("Hello World")
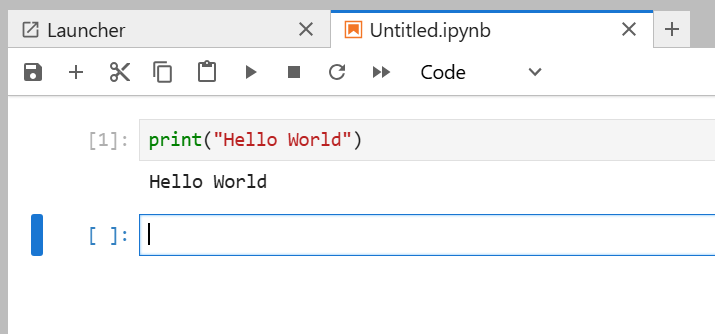
4.3.3 Activate the cell and click on Run. (Run is the small triangle.) This completes your first test program.
Hello World
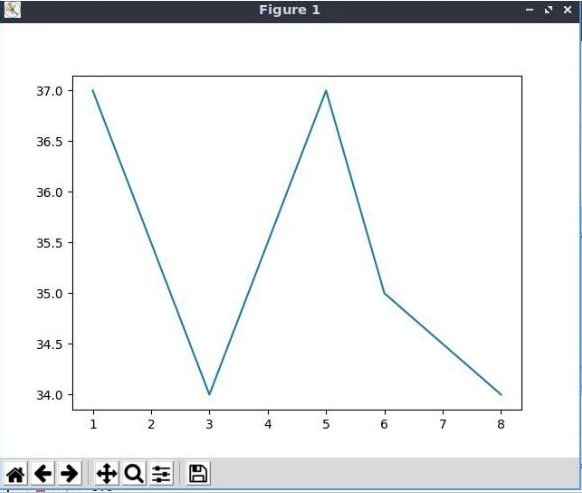
4.3.4 Enter the following plotting program. Run it.
# A simple plotting program

      # import matplotlib to plot graphs, and numpy for arrays

      import matplotlib.pyplot as plt

      import numpy as np

      days = [1,3,5,6,8,]

      temp = [37,34,37,35,34]

      plt.plot(days, temp)

      plt.show()
4.3.5 If you make a mistake entering the program, there could be an error message in the cell below the program code. Simply right click on the error message cell, and select Clear Cell Output from the drop-down menu. Make corrections to your code and run it again.
4.3.6 Above we created a new notebook with the title Untitled.ipynb. We used it to run our programs. We can rename the note book by right-clicking on the title and renaming the title.
4.3.7 We installed the following libraries during setup: numpy pandas matplotlib seaborn scikit-learn scipy. Other libraries can be imported as necessary. We imported numpy to work with our data, and matplotlib to plot our chart.
4.4.1 Notebooks are created and saved as .ipynb files. Your work is automatically saved every two minutes. You can manually save your work using the floppy icon in the dashboard. Notebooks are stored in C:\Users\YourUserName in Windows 11. Notebooks are stored in your user folder in Ubuntu.
4.5.1 Closing the Notebook and the command line windows will close your session. Your work is saved on your computer.
4.6.1 From time to time you will need to upload data files to Jupyter Notebook. You will see an upload button (an up arrow icon) in the dashboard. Files will be uploaded to the current directory in Jupyter Notebook. We can read CSV, non-CSV, and Excel files. CSV stands for comma separated values. Two samples of download code are provided.
#Read a CSV file

        import pandas as pd

        #Provide the full path to the file

          df = pd.read_csv('/path/to/your/file.csv')

          df.head()
The df.head() method in pandas is used to return the first n rows of a DataFrame. By default, it returns the first 5 rows if no parameter is specified. The following shows how an Excel file can be read.
#Read an Excel file

          import pandas as pd

          df = pd.read_excel('/path/to/your/file.xlsx')

          df.head()
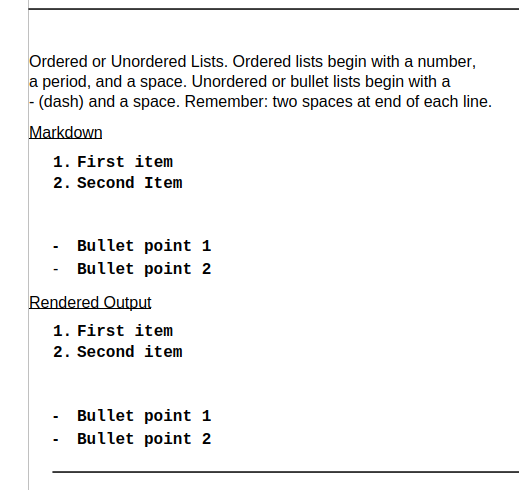
4.7.1 Markdown is a simple language that allows you to format text and add headings, list, links, images, and more. This text is directly entered into your cell after designating it a markdown cell. Remember to create line breaks with two spaces at the end of each line. Spacing is important while entering Markdown symbols.
4.7.2 Select a cell. Look at the toolbar above your notebook. Click on Code and a dropdown menu will appear. Select Markdown. The selected cell is now a Markdown cell. Enter your text with Markdown symbols. After entering text press Shift+Enter and the text will be executed.
4.7.3 Headings example. Activate a Markdown cell. Type the following in the cell. Leave a space between the # and My or the # will not act as a Markdown character. Leave two spaces after the text to indicate end of line.
# My Title
4.7.4 Press Shift+Enter to run the cell. The following will be rendered.
My Title
4.7.5 There are dozens of Markdowns available for Jupyter. I will list only a few in the following table. The internet has many Markdown tables.